This guide is intended to help you get from an idea of fixing a bug or implementing a new feature into a nightly Scala build, and, ultimately, to a production release of Scala incorporating your idea.
This guide covers the entire process, from the conception of your idea or bugfix to the point where it is merged into Scala. Throughout, we will use a running example of an idea or bugfix one might wish to contribute.
Other good starting points for first-time contributors include the Scala README and contributor’s guidelines.
The Running Example
Let’s say that you particularly enjoy the new string interpolation language feature introduced in Scala 2.10.0, and you use it quite heavily.
Though, there’s an annoying issue
which you occasionally stumble upon: the formatting string interpolator f does not support
new line tokens %n.
One approach would be to go the Scala 2 bug tracker, request that the bug be fixed, and then to wait indefinitely for the fix arrive. Another approach would be to instead patch Scala yourself, and to submit the fix to the Scala repository in hopes that it might make it into a subsequent release.
Of note: There are several types of releases/builds. Nightly builds are produced every night at a fixed time. Minor releases happen once every few months. Major releases typically happen once per year.
1. Connect
Sometimes it’s appealing to hack alone and not to have to interact with others. However, in the context a big project such as Scala, there might be better ways. There are people in the Scala community who have spent years accumulating knowledge about Scala libraries and internals. They might provide unique insights and, what’s even better, direct assistance in their areas, so it is not only advantageous, but recommended to communicate with the community about your new patch.
Typically, bug fixes and new features start out as an idea or an experiment posted on one of our forums to find out how people feel about things you want to implement. People proficient in certain areas of Scala usually monitor forums and discussion rooms, so you’ll often get some help by posting a message. But the most efficient way to connect is to mention in your message one of the people responsible for maintaining the aspect of Scala which you wish to contribute to.
A list of language features/libraries along with their maintainer’s full names and GitHub usernames is in the Scala repo README.
In our running example, since Martin is the person who submitted the string interpolation Scala Improvement Proposal and implemented this language feature for Scala 2.10.0, he might be interested in learning of new bugfixes to that feature.
As alluded to earlier, one must also choose an appropriate avenue to discuss the issue. Typically, one would use the Scala Contributor’s Forum, as there are post categories devoted to discussions about the core internal design and implementation of the Scala system.
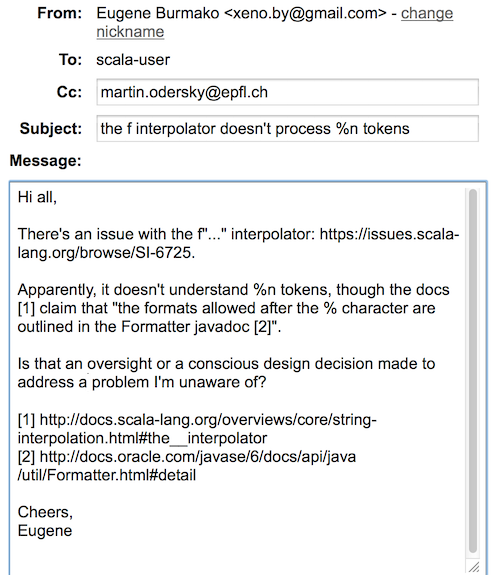
In this example, the issue was previously discussed on the (now unused) scala-user mailing list, at the time, we would have posted to the (now unused) scala-user mailing list about our issue:
Now that we have the approval of the feature’s author, we can get to work!
2. Set up
Hacking Scala begins with creating a branch for your work item. To develop Scala we use Git and GitHub. This section of the guide provides a short walkthrough, but if you are new to Git, it probably makes sense to familiarize yourself with Git first. We recommend
- the Git Pro online book.
- the help page on Forking a Git Repository.
- this great training tool LearnGitBranching. One-hour hands-on training helps more than 1000 hours reading.
Fork
Log into GitHub, go to https://github.com/scala/scala and click the Fork
button in the top right corner of the page. This will create your own copy of our repository that will serve as a scratchpad for your work.
If you’re new to Git, don’t be afraid of messing up– there is no way you can corrupt our repository.

Clone
If everything went okay, you will be redirected to your own fork at https://github.com/user-name/scala, where username
is your GitHub username. You might find it helpful to read https://help.github.com/fork-a-repo/,
which covers some things that will follow below. Then, clone your repository (i.e. pull a copy from GitHub to your local machine) by running the following on the command line:
16:35 ~/Projects$ git clone https://github.com/xeno-by/scala
Cloning into 'scala'...
remote: Counting objects: 258564, done.
remote: Compressing objects: 100% (58239/58239), done.
remote: Total 258564 (delta 182155), reused 254094 (delta 178356)
Receiving objects: 100% (258564/258564), 46.91 MiB | 700 KiB/s, done.
Resolving deltas: 100% (182155/182155), done.
This will create a local directory called scala, which contains a clone of your own copy of our repository. The changes that you make
in this directory can be propagated back to your copy hosted on GitHub and, ultimately, pushed into Scala when your patch is ready.
Branch
Before you start making changes, always create your own branch. Never work on the master branch. Think of a name that describes
the changes you plan on making. Use a prefix that describes the nature of your change. There are essentially two kinds of changes:
bug fixes and new features.
- For bug fixes, use
issue/NNNNorticket/NNNNfor bugNNNNfrom the Scala bug tracker. - For new feature use
topic/XXXfor featureXXX. Use feature names that make sense in the context of the whole Scala project and not just to you personally. For example, if you work on diagrams in Scaladoc, usetopic/scaladoc-diagramsinstead of justtopic/diagramswould be a good branch name.
Since in our example, we’re going to fix an existing bug
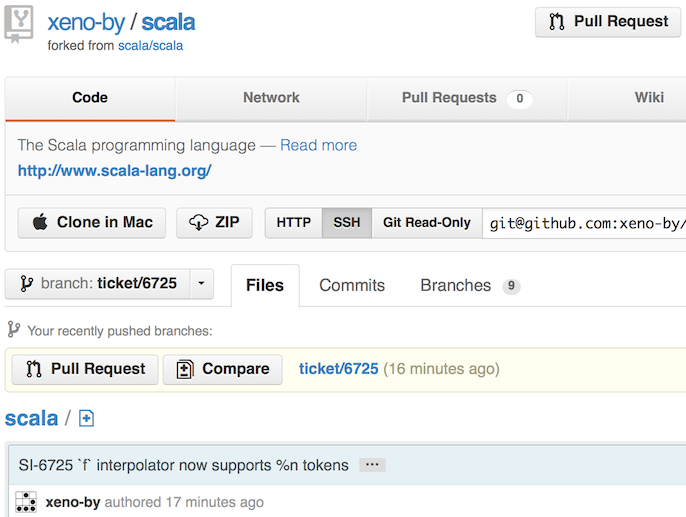
scala/bug#6725, we’ll create a branch named ticket/6725.
16:39 ~/Projects/scala (master)$ git checkout -b ticket/6725
Switched to a new branch 'ticket/6725'
If you are new to Git and branching, read the Branching Chapter in the Git Pro book.
Build
The next step after cloning your fork is setting up your machine to build Scala.
You need the following tools:
- A Java JDK. The baseline version is
8for 2.13.x and higher. It’s possible to use a higher JDK version for local development, but the continuous integration builds will verify against the baseline version. sbt, an interactive build tool commonly used in Scala projects. Acquiring sbt manually is not necessary – the recommended approach is to download the sbt-extras runner script and use it in place ofsbt. The script will download and run the correct version of sbt when run from the Scala repository’s root directory.curl– the build usescurlin thepull-binary-libs.shscript to download bootstrap libs.
macOS and Linux builds should work. Windows is supported, but it might have issues. Please report to the Scala 2 bug tracker if you encounter any.
Building Scala can be done with a single command sbt dist/mkPack, from the root of your cloned repository. In general, it’s much more efficient to enter the sbt shell once and run the various tasks from there, instead of running each task by launching sbt some-task on your command prompt.
Be prepared to wait for a while – a full “clean” build takes 5+ minutes depending on your machine (longer on older machines with less memory). On a recent laptop, incremental builds usually complete within 10-30 seconds.
IDE
There’s no single editor of choice for working with Scala sources, as there are trade-offs associated with each available tool.
IntelliJ IDEA has a Scala plugin, which is known to work with our codebase. Alternatively you can use Visual Studio Code with the Metals IDE extension. Both of these Scala IDE solutions provide navigation, refactoring, error reporting functionality, and integrated debugging. See the Scala README for instructions on using either IntelliJ IDEA or Metals with the Scala repository.
Other alternative editors exist, such as Atom, Emacs, Sublime Text or jEdit. These are faster and much less memory/compute-intensive to run, but lack semantic services and debugging.
We recognise that there exist preferences towards specific IDE/editor experiences, so ultimately we recommend that your choice be your personal preference.
3. Hack
When hacking on your topic of choice, you’ll be modifying Scala, compiling it and testing it on relevant input files. Typically, you would want to first make sure that your changes work on a small example and afterwards verify that nothing break by running a comprehensive test suite.
We’ll start by creating a sandbox directory (./sandbox is listed in the .gitignore of the Scala repository), which will hold a single test file and its compilation results. First, let’s make sure that
the bug is indeed reproducible by putting together a simple test and compiling and running it with the Scala compiler that we built using sbt. The Scala compiler that we just built is located in build/pack/bin.
17:25 ~/Projects/scala (ticket/6725)$ mkdir sandbox
17:26 ~/Projects/scala (ticket/6725)$ cd sandbox
17:26 ~/Projects/scala/sandbox (ticket/6725)$ edit Test.scala
17:26 ~/Projects/scala/sandbox (ticket/6725)$ cat Test.scala
object Test extends App {
  val a = 1
  val s = f"$a%s%n$a%s"
  println(s)
}
17:27 ~/Projects/scala/sandbox (ticket/6725)$ ../build/pack/bin/scalac Test.scala
17:28 ~/Projects/scala/sandbox (ticket/6725)$ ../build/pack/bin/scala Test
1%n1 // %n should've been replaced by a newline here
Implement
Now, implement your bugfix or new feature!
Here are also some tips & tricks that have proven useful in Scala development:
- After building your working copy with the
compilesbt task, there’s no need to leave the comfort of your sbt shell to try it out: the REPL is available as thescalatask, and you can also run the compiler using thescalactask. If you prefer to run the REPL outside sbt, you can generate the scripts inbuild/quick/binusing thedist/mkQuicktask. - The sbt workflow is also great for debugging, as you can create a remote debugging session in your favorite IDE, and then activate the JVM options for the next time you run the
scalaorscalactasks using:
> set javaOptions in compiler := List("-agentlib:jdwp=transport=dt_socket,server=y,suspend=n,address=8002")
> scalac test.scala
[info] Running scala.tools.nsc.Main -usejavacp test.scala
Listening for transport dt_socket at address: 8002
- Also see the Scala README for tips on speeding up compile times.
- If after introducing changes or updating your clone, you get
AbstractMethodErroror other linkage exceptions, try thecleantask and building again. - Don’t underestimate the power of using
printlnto print debug information. When starting with Scala, I spent a lot of time in the debugger trying to figure out how things work. However later I found out that print-based debugging is often more effective than jumping around. It’s also useful to print stack traces to understand the flow of execution, for example what code executed before some action occurred. When working withTrees, you might want to useshowRawto get theASTrepresentation. - You can publish your newly-built scala version locally using the
publishLocaltask in sbt. - It’s convenient to enable the following local settings to speed up your workflow (put these in
local.sbtin your working copy):
// skip docs for local publishing
publishArtifact in (Compile, packageDoc) in ThisBuild := false
// set version based on current sha, so that you can easily consume this build from another sbt project
baseVersionSuffix := s"local-${Process("tools/get-scala-commit-sha").lines.head.substring(0, 7)}"
// show more logging during a partest run
testOptions in IntegrationTest in LocalProject("test") ++= Seq(Tests.Argument("--show-log"), Tests.Argument("--show-diff"))
// if incremental compilation is compiling too much (should be fine under sbt 0.13.13)
// antStyle := true
- Adding a macro to the
Predefobject is a pretty involved task. Due to bootstrapping, it makes it more complex to add a macro. For this reason, the process is more involved. It could be useful to replicate the wayStringContext.fitself is added. In short, you need to define your macro undersrc/compiler/scala/tools/reflect/and provide no implementation inPredef(it will look likedef fn = macro ???). Now you have to set up the wiring. Add the name of your macro tosrc/reflect/scala/reflect/internal/StdNames.scala, add the needed links to it tosrc/reflect/scala/reflect/internal/Definitions.scala, and finally specify the bindings insrc/compiler/scala/tools/reflect/FastTrack.scala. Here’s an example of adding a macro.
Where to Find Documentation
The separate projects under Scala have varying amounts of documentation:
The Scala Library
Contributing to the Scala standard library is about the same as working on one of your own libraries.
If documentation is necessary for some trait/class/object/method/etc in the Scala standard library, typically maintainers will include inline comments describing their design decisions or rationale for implementing things the way they have, if it is not straightforward.
The Scala collections framework, part of the Scala standard library, is more complex. You should become familiar with its architecture, which is documented in the Architecture of Scala Collections. The Scala Collections Guide is more general, covering the synchronous portion of collections. For parallel collections, there also exists a detailed Scala Parallel Collections Guide.
The Scala Compiler
Documentation about the internal workings of the Scala compiler is scarce, and most of the knowledge is passed around by forum (Scala Contributors forum), chat-rooms (see #scala-contributors on Discord), ticket, or word of mouth. However, the situation is steadily improving. Here are the resources that might help:
- Compiler internals videos by Martin Odersky are quite dated, but still very useful. In this three-video
series Martin explains the general architecture of the compiler, and the basics of the front-end, which later became the
scala-reflectmodule’s API. - Reflection documentation describes fundamental data structures (like
Trees,Symbols, andTypes) that are used to represent Scala programs and operations defined on then. Since much of the compiler has been factored out and made accessible via thescala-reflectmodule, all the fundamentals needed for reflection are the same for the compiler. - Scala compiler corner contains extensive documentation about most of the post-typer phases (i.e. the backend) in the Scala compiler.
- Scala Contributors, a forum which hosts discussions about the core internal design and implementation of the Scala system.
Other Projects
Tools like Scaladoc also welcome contributions. Unfortunately these smaller projects have less developer documentation. In these cases, the best thing to do is to directly explore the code base (which often contains documentation as inline comments) or to write to the appropriate maintainers for pointers.
Interlude
To fix the bug we’re interested in we’ve tracked the StringContext.f interpolator
down to a macro implemented in MacroImplementations.scala There we notice that the interpolator only processes conversions,
but not tokens like %n. Looks like an easy fix.
18:44 ~/Projects/scala/sandbox (ticket/6725)$ git diff
diff --git a/src/compiler/scala/tools/reflect/MacroImplementations.scala b/src/compiler/scala/tools/
index 002a3fce82..4e8f02084d 100644
--- a/src/compiler/scala/tools/reflect/MacroImplementations.scala
+++ b/src/compiler/scala/tools/reflect/MacroImplementations.scala
@@ -117,7 +117,8 @@ abstract class MacroImplementations {
       if (!strIsEmpty) {
         val len = str.length
         while (idx < len) {
-          if (str(idx) == '%') {
+          def notPercentN = str(idx) != '%' || (idx + 1 < len && str(idx + 1) != 'n')
+          if (str(idx) == '%' && notPercentN) {
             bldr append (str substring (start, idx)) append "%%"
             start = idx + 1
           }
After applying the fix and running sbt compile, our simple test case in sandbox/Test.scala started working!
18:51 ~/Projects/scala/sandbox (ticket/6725)$ cd ..
18:51 ~/Projects/scala (ticket/6725)$ sbt compile
...
[success] Total time: 18 s, completed Jun 6, 2016 9:03:02 PM
Total time: 18 seconds

18:51 ~/Projects/scala (ticket/6725)$ cd sandbox
18:51 ~/Projects/scala/sandbox (ticket/6725)$ ../build/pack/bin/scalac Test.scala
18:51 ~/Projects/scala/sandbox (ticket/6725)$ ../build/pack/bin/scala Test
1
1 // no longer getting the %n here - it got transformed into a newline
Test
To guard your change against accidental breakage in the future, it is important to add tests. I have already written one test earlier, so that’s a good start but not enough! Apart from obvious usages of our new functionality, we need to cover corner-cases as well.
Adding tests to the test suite is as easy as moving them to the appropriate directory:
- Code which should compile successfully, but doesn’t need to be executed, needs to go into the “pos” directory.
- Code which should not compile needs to go into the “neg” directory.
- Code which should compile and get executed by the test suite needs to go into the “run” directory and have a corresponding
.checkfile with the expected output. You will get test failures if the content of a.checkfile is different from what the test produces while running. If the change in the output is an expected product of your work, you might not want to change the.checkfile by hand. To make partest change the.checkfile, run it with a--update-checkflag, like so./test/partest --update-check path/to/test.scala. For more information on partest, please refer to its documentation. - Everything that can be unit-tested should go to “junit” directory
- Property-based tests go to the “scalacheck” directory
Here are some more testing tips:
- If you have several tests, and want a tool for only running tests that conform to some regular expression, you can use
partest-ackin thetoolsdirectory:./tools/partest-ack "dottype".partest-ackwas removed in 2.12. - If you want to run all scalacheck tests from sbt use
scalacheck/testOnly - To run scalacheck tests by name when in sbt use
scalacheck/testOnly <test1> ... <testN>, for examplescalacheck/testOnly scala.tools.nsc.scaladoc.HtmlFactoryTest -
If your tests fail in the following way:
  test.bc:
     [echo] Checking backward binary compatibility for scala-library (against 2.11.0)
     [mima] Found 2 binary incompatibiities
     [mima] ================================
     [mima]  * synthetic method
     [mima]    scala$package$Class$method(java.lang.String)Unit in trait
     [mima]    scala.package.Class does not have a correspondent in old version
     [mima]  * synthetic method
     [mima]    scala$package$AnotherClass$anotherMethod(java.lang.String)Unit in trait
     [mima]    scala.package.AnotherClass does not have a correspondent in old version
     [mima] Generated filter config definition
     [mima] ==================================
     [mima]
     [mima]     filter {
     [mima]         problems=[
     [mima]             {
     [mima]                 matchName="scala.package.Class$method"
     [mima]                 problemName=MissingMethodProblem
     [mima]             },
     [mima]             {
     [mima]                 matchName="scala.package.AnotherClass$anotherMethod"
     [mima]                 problemName=MissingMethodProblem
     [mima]             }
     [mima]         ]
     [mima]     }
     [mima]

   ...
   Finished: FAILURE
This means your change is backward or forward binary incompatible with the specified version (the check is performed by the migration manager). The error message is actually saying what you need to modify project/MimaFilters.scala to make the error go away. If you are getting this on an internal/experimental api, it should be safe to add suggested sections to the config. Otherwise, you might want to target a newer version of scala for this change.
Verify
Now to make sure that my fix doesn’t break anything I need to run the test suite. The Scala test suite uses JUnit and partest, a tool we wrote for testing Scala.
Run sbt test and sbt partest to run all the JUnit and partest tests, respectively.
partest (not sbt partest) also allows you to run a subset of the tests using wildcards:
18:52 ~/Projects/scala/sandbox (ticket/6725)$ cd ../test
18:56 ~/Projects/scala/test (ticket/6725)$ partest files/run/*interpol*
Testing individual files
testing: [...]/files/run/interpolationArgs.scala                      [  OK  ]
testing: [...]/files/run/interpolationMultiline1.scala                [  OK  ]
testing: [...]/files/run/interpolationMultiline2.scala                [  OK  ]
testing: [...]/files/run/sm-interpolator.scala                        [  OK  ]
testing: [...]/files/run/interpolation.scala                          [  OK  ]
testing: [...]/files/run/stringinterpolation_macro-run.scala          [  OK  ]
All of 6 tests were successful (elapsed time: 00:00:08)
4. Publish
After development is finished, it’s time to publish the code and submit your patch for discussion and potential inclusion into Scala. In a nutshell, this involves:
- making sure that your code and commit messages are of high quality,
- clicking a few buttons in the GitHub interface,
- assigning one or more reviewers who will look through your pull request.
Let’s go into each of these points in more detail.
Commit
The Git Basics chapter in the Git online book covers most of the basic workflow during this stage. There are two things you should know here:
- Commit messages are often the only way to understand the intentions of authors of code written a few years ago. Thus, writing a quality is of utmost importance. The more context you provide for the change you’ve introduced, the larger the chance that some future maintainer understand your intentions. Consult the pull request policies for more information about the desired style of your commits.
- Keeping Scala’s git history clean is also important. Therefore we won’t accept pull requests for bug fixes that have more than one commit. For features, it is okay to have several commits, but all tests need to pass after every single commit. To clean up your commit structure, you want to rewrite history using
git rebaseso that your commits are against the latest revision ofmaster.
Once you are satisfied with your work, synced with master and cleaned up your commits you are ready to submit a patch to the central Scala repository. Before proceeding make sure you have pushed all of your local changes to your fork on GitHub.
19:22 ~/Projects/scala/test (ticket/6725)$ git add ../src/compiler/scala/tools/reflect/MacroImplementations.scala
19:22 ~/Projects/scala/test (ticket/6725)$ git commit
[ticket/6725 3c3098693b] SI-6725 `f` interpolator now supports %n tokens
 1 file changed, 2 insertions(+), 1 deletion(-)
19:34 ~/Projects/scala/test (ticket/6725)$ git push origin ticket/6725
Username for 'https://github.com': xeno-by
Password for 'https://[email protected]':
Counting objects: 15, done.
Delta compression using up to 8 threads.
Compressing objects: 100% (8/8), done.
Writing objects: 100% (8/8), 1.00 KiB, done.
Total 8 (delta 5), reused 0 (delta 0)
To https://github.com/xeno-by/scala
 * [new branch]            ticket/6725 -> ticket/6725
Submit
Now, we must simply submit our proposed patch. Navigate to your branch in GitHub (for me, it was https://github.com/xeno-by/scala/tree/ticket/6725)
and click the pull request button to submit your patch as a pull request to Scala. If you’ve never submitted patches to Scala, you will
need to sign the contributor license agreement, which can be done online within a few minutes.
Review
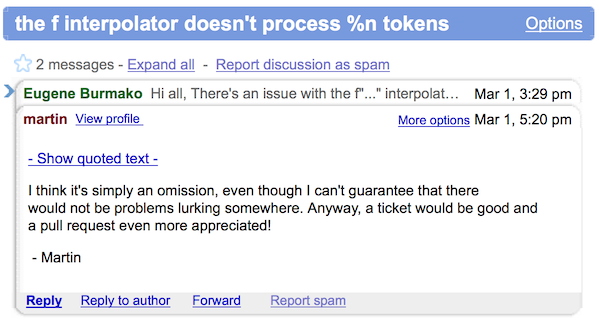
After the pull request has been submitted, you need to pick a reviewer (usually the person you’ve contacted in the beginning of your workflow) and be ready to elaborate and adjust your patch if necessary. In this example, we picked Martin, because we had such a nice chat on the mailing list:

Merge
After your reviewer is happy with your code (usually signaled by a LGTM — “Looks good to me”), your job is done. Note that there can be a gap between a successful review and the merge, because not every reviewer has merge rights. In that case, someone else from the team will pick up your pull request and merge it. So don’t be confused if your reviewer says “LGTM”, but your code doesn’t get merged immediately.