This document targets developers who want to publish their work as a library that other programs can depend on. The document steps through the main questions that should be answered before publishing an open source library, and shows how a typical development environment looks like.
An example of library that follows the recommendations given here is available at https://github.com/scalacenter/library-example. For the sake of conciseness, this example uses commonly chosen technologies like GitHub, Travis CI, and sbt, but alternative technologies will be mentioned and adapting the contents of this document for them should be straightforward.
Choose an Open Source License
The first step consists in choosing an open source license specifying under which conditions the library can be reused by other people. You can browse the already existing open source licenses on the opensource.org website. If you don’t know which one to pick, we suggest using the Apache License 2.0, which allows users to use (including commercial use), share, modify and redistribute (including under different terms) your work under the condition that the license and copyright notices are preserved. For the record, Scala itself is licensed with Apache 2.0.
Once you have chosen a license, apply it to your project by creating a LICENSE file in the root directory
of your project with the license contents or a link to it. This file usually indicates who owns the copyright.
In our example of LICENSE file, we have
written that all the contributors (as per the Git log) own the copyright.
Host the Source Code
We recommend sharing the source code of your library by hosting it on a public Git hosting site such as GitHub, Bitbucket or GitLab. In our example, we use GitHub.
Your project should include a README file including a description of what the library does and some documentation (or links to the documentation).
You should take care of putting only source files under version control. For instance, artifacts generated by the build system should not be versioned. You can instruct Git to ignore such files by adding them to a .gitignore file.
In case you are using sbt, make sure your repository has a project/build.properties file indicating the sbt version to use, so that people (or tools) working on your repository will automatically use the correct sbt version.
Setup Continuous Integration
The first reason for setting up a continuous integration (CI) server is to systematically run tests on pull requests. Examples of CI servers that are free for open source projects are GitHub Actions, Travis CI, Drone or AppVeyor.
Our example uses GitHub Actions. This feature is enabled by default on GitHub repositories. You can verify if that is the case in the Actions section of the Settings tab of the repository. If Disable all actions is checked, then Actions are not enabled, and you can activate them by selecting Allow all actions, Allow local actions only or Allow select actions.
With Actions enabled, you can create a workflow definition file. A workflow is an automated procedure, composed of one or more jobs. A job is a set of sequential steps that are executed on the same runner. A step is an individual task that can run commands; a step can be either an action or a shell command. An action is the smallest building block of a workflow, it is possible to reuse community actions or to define new ones.
To create a workflow, create a yaml file in the directory .github/workflows/ in the repository, for example
.github/workflows/ci.yml with the following content:
name: Continuous integration
on: push

jobs:
  ci:
    runs-on: ubuntu-latest
    steps:
      - uses: actions/checkout@v3 # Retrieve the content of the repository
      - uses: actions/setup-java@v3 # Set up a jdk
        with:
          distribution: temurin
          java-version: 8
          cache: sbt # Cache the artifacts downloaded by sbt accross CI runs
      - name: unit tests # Custom action consisting of a shell command
        run: sbt +test
This workflow is called Continuous integration, and it will run every time one
or more commits are pushed to the repository. It contains only one job called
ci, which will run on an Ubuntu runner and that is composed of three
actions. The action setup-java installs a JDK and caches the library dependencies
downloaded by sbt so that they are not downloaded again everytime the CI runs.
Then, the job runs sbt +test, which loads the sbt version specified in
project/build.properties, and runs the project tests using the Scala version
defined in the file build.sbt.
The workflow above will run at any push to any branch of the repository. You
can specify the branch or add more triggers such as pull requests, releases,
tags or schedules. More information about workflow triggers is available
here.
while the setup-java action is hosted in this
repository.
For reference, here is our complete workflow example file.
Publish a Release
Most build tools resolve third-party dependencies by looking them up on public repositories such as
Maven Central. These repositories host
the library binaries as well as additional information such as the library authors, the open source
license, and the dependencies of the library itself. Each release of a library is identified by
a groupId, an artifactId, and a version number. For instance, consider the following dependency
(written in sbt’s syntax):
"org.slf4j" % "slf4j-simple" % "1.7.25"
Its groupId is org.slf4j, its artifactId is slf4j-simple, and its version is 1.7.25.
In this document, we show how to publish the Maven Central repository. This process requires having a Sonatype account and a PGP key pair to sign the binaries.
Create a Sonatype Account and Project
Follow the instructions given on the OSSRH Guide
to create a new Sonatype account (unless you already have one) and to
create a new project ticket. This latter
step is where you define the groupId that you will release to. You can use a domain name that you already own,
otherwise a common practice is to use io.github.(username) (where (username) is replaced with your GitHub
username).
This step has to be performed only once per groupId you want to have.
Create a PGP Key Pair
Sonatype requires that you sign the published files with PGP. Follow the instructions here to generate a key pair and to distribute your public key to a key server.
This step has to be performed only once per person.
Setup Your Project
In case you use sbt, we recommend using the sbt-sonatype
and sbt-pgp plugins to publish your artifacts. Add the following
dependencies to your project/plugins.sbt file:
addSbtPlugin("org.xerial.sbt" % "sbt-sonatype" % "3.9.21")
addSbtPlugin("com.github.sbt" % "sbt-pgp" % "2.2.1")
And make sure your build fulfills the Sonatype requirements by defining the following settings:
// used as `artifactId`
name := "library-example"

// used as `groupId`
organization := "ch.epfl.scala"

// open source licenses that apply to the project
licenses := Seq("APL2" -> url("https://www.apache.org/licenses/LICENSE-2.0.txt"))

description := "A library that does nothing useful"

import xerial.sbt.Sonatype._
sonatypeProjectHosting := Some(GitHubHosting("scalacenter", "library-example", "[email protected]"))

// publish to the sonatype repository
publishTo := sonatypePublishToBundle.value
Put your Sonatype credentials in a $HOME/.sbt/1.0/sonatype.sbt file:
credentials += Credentials("Sonatype Nexus Repository Manager",
        "oss.sonatype.org",
        "(Sonatype user name)",
        "(Sonatype password)")
(Put your actual username and password in place of (Sonatype user name) and (Sonatype password))
Never check this file into version control.
Last, we recommend using the sbt-dynver plugin to set the version number
of your releases. Add the following dependency to your project/plugins.sbt file:
addSbtPlugin("com.github.sbt" % "sbt-dynver" % "5.0.1")
And make sure your build does not define the version setting.
Cut a Release
With this setup, the process for cutting a release is the following.
Create a Git tag whose name begins with a lowercase v followed by the version number:
$ git tag v0.1.0
This tag is used by sbt-dynver to compute the version of the release (0.1.0, in this example).
Deploy your artifact to the Central repository with the publishSigned sbt task:
$ sbt publishSigned
sbt-sonatype will package your project and ask your PGP passphrase to sign the files with your PGP key.
It will then upload the files to Sonatype using your account credentials. Deployments can be viewed in the
Central Publisher Portal once the staging repository has been closed (see sonatypeRelease below).
Finally, perform the release with the sonatypeRelease sbt task:
$ sbt sonatypeRelease
Setup Continuous Publication
The release process described above has some drawbacks:
- it requires running three commands,
- it does not guarantee that the library is in a stable state when it is published (ie, some tests may be failing),
- in case you work in a team, each contributor has to setup its own PGP key pair and have to have Sonatype
credentials with access to the project’s
groupId.
Continuous publication addresses these issues by delegating the publication process to the CI server. It works as follows: any contributor with write access to the repository can cut a release by pushing a Git tag, the CI server first checks that the tests pass and then runs the publication commands.
We achieve this by replacing the plugins sbt-pgp, sbt-sonatype, and sbt-dynver with sbt-ci-release, in the file project/plugins.sbt:
- addSbtPlugin("com.github.sbt" % "sbt-pgp" % "2.2.1")
- addSbtPlugin("org.xerial.sbt" % "sbt-sonatype" % "3.9.21")
- addSbtPlugin("com.github.sbt" % "sbt-dynver" % "5.0.1")
+ addSbtPlugin("com.github.sbt" % "sbt-ci-release" % "1.5.12")
The remaining sections show how to setup GitHub Actions for continuous publication on Sonatype. You can find instructions for Travis CI in the sbt-ci-release plugin documentation.
Setup the CI Server
You have to give your Sonatype account credentials to the CI server, as well as your PGP key pair. Fortunately, it is possible to securely give this information by using the secret management system of the CI server.
Export Your Sonatype Account Credentials
Create two GitHub Encrypted secrets
for your Sonatype account credentials: SONATYPE_USERNAME and SONATYPE_PASSWORD.
To do so, go to the Settings tab of the repository and select Secrets on the left panel.
You can then use the button New repository secret to open the secret creation menu where you will enter
the name of the secret and its content.
Repository Secrets allow us to safely store confidential information and to expose it to Actions workflows without the risk of committing them to git history.
Export Your PGP Key Pair
To export your PGP key pair, you first need to know its identifier. Use the following command to list your PGP keys:
$ gpg --list-secret-keys
/home/julien/.gnupg/secring.gpg
-------------------------------
sec   2048R/BE614499 2016-08-12
uid                  Julien Richard-Foy <[email protected]>
In my case, I have one key pair, whose ID is BE614499.
Then:
- Create a new Secret containing the passphrase of your PGP key named
PGP_PASSPHRASE. - Create a new Secret containing the base64 encoded secret of your private key named
PGP_SECRET. The encoded secret can obtain by running:# macOS gpg --armor --export-secret-keys $LONG_ID | base64 # Ubuntu (assuming GNU base64) gpg --armor --export-secret-keys $LONG_ID | base64 -w0 # Arch gpg --armor --export-secret-keys $LONG_ID | base64 | sed -z 's;\n;;g' # FreeBSD (assuming BSD base64) gpg --armor --export-secret-keys $LONG_ID | base64 # Windows gpg --armor --export-secret-keys %LONG_ID% | openssl base64 - Publish your public key signature to a public server, for example http://keyserver.ubuntu.com:11371.
You can obtain the signature by running:
# macOS and linux
gpg --armor --export $LONG_ID
# Windows
gpg --armor --export %LONG_ID%
(Replace
(key ID)with your key ID)
Publish From the CI Server
On GitHub Actions, you can define a workflow to publish the library when a tag starting with “v” is pushed:
# .github/workflows/publish.yml
name: Continuous publication
on:
  push:
    tags: [v*]

jobs:
  release:
    runs-on: ubuntu-latest
    steps:
      - uses: actions/checkout@v3
        with:
          fetch-depth: 0 # fetch all tags, required to compute the release version
      - uses: actions/setup-java@v3
        with:
          distribution: temurin
          java-version: 8
          cache: sbt
      - run: sbt ci-release
        env:
          PGP_PASSPHRASE: ${{ secrets.PGP_PASSPHRASE }}
          PGP_SECRET: ${{ secrets.PGP_SECRET }}
          SONATYPE_PASSWORD: ${{ secrets.SONATYPE_PASSWORD }}
          SONATYPE_USERNAME: ${{ secrets.SONATYPE_USERNAME }}
The env statement exposes the secrets you defined earlier to the publication process through
environment variables.
Cut a Release
Just push a Git tag:
$ git tag v0.2.0
$ git push origin v0.2.0
This will trigger the workflow, which will ultimately invoke sbt ci-release, which will perform a publishSigned followed by a sonatypeRelease.
Cross-Publish
If you have written a library, you probably want it to be usable from several Scala major versions (e.g., 2.12.x, 2.13.x, 3.x, etc.).
Define the versions you want to support in the crossScalaVersions setting, in your build.sbt file:
crossScalaVersions := Seq("3.3.0", "2.13.12", "2.12.18")
scalaVersion := crossScalaVersions.value.head
The second line makes sbt use by default the first Scala version of the crossScalaVersions.
The CI job will use all the Scala versions of your build definition.
Publish Online Documentation
An important property of documentation is that the code examples should compile and behave as they are presented. There are various ways to ensure that this property holds. One way, supported by mdoc, is to actually evaluate code examples and write the result of their evaluation in the produced documentation. Another way consists in embedding snippets of source code coming from a real module or example.
The sbt-site plugin can help you organize, build and preview your documentation. It is well integrated with other sbt plugins for generating the documentation content or for publishing the resulting documentation to a web server.
Finally, a simple solution for publishing the documentation online consists in using the GitHub Pages service, which is automatically available for each GitHub repository. The sbt-ghpages plugin can automatically upload an sbt-site to GitHub Pages.
Create the Documentation Site
In this example we choose to use Paradox because it runs on the JVM and thus doesn’t require setting up another VM on your system (in contrast with most other documentation generators, which are based on Ruby, Node.js or Python).
To install Paradox and sbt-site, add the following lines to your project/plugins.sbt file:
addSbtPlugin("com.github.sbt" % "sbt-site-paradox" % "1.5.0")
And then add the following configuration to your build.sbt file:
enablePlugins(ParadoxSitePlugin, SitePreviewPlugin)
Paradox / sourceDirectory := sourceDirectory.value / "documentation"
The ParadoxSitePlugin provides a task makeSite that generates a website using Paradox, and the SitePreviewPlugin provides handy tasks when working on the website content, to preview the result in your browser.
The second line is optional, it defines the location of the website source files. In our case, in
src/documentation.
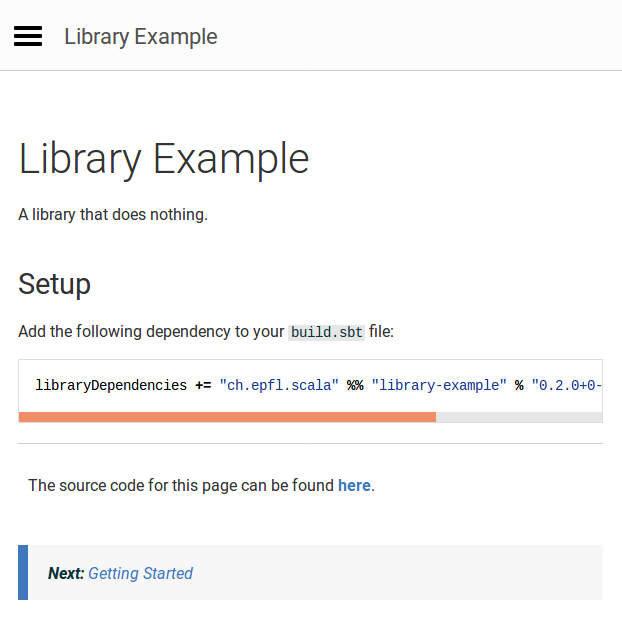
Add your documentation entry point in an src/documentation/index.md file. A typical documentation entry point
uses the library name as title, shows a short sentence describing the purpose of the library, and a code
snippet for adding the library to a build definition:
# Library Example

A library that does nothing.

## Setup

Add the following dependency to your `build.sbt` file:

@@@vars
~~~ scala
libraryDependencies += "ch.epfl.scala" %% "library-example" % "$project.version$"
~~~
@@@

@@@ index
* [Getting Started](getting-started.md)
* [Reference](reference.md)
@@@
Note that in our case we rely on a variable substitution mechanism to inject the correct version number in the documentation so that we don’t have to always update that part of the docs each time we publish a new release.
Our example also includes an @@@index directive, defining how the content of the documentation is organized.
In our case, the documentation contains two pages, the first one provides a quick tutorial for getting
familiar with the library, and the second one provides more detailed information.
The sbt-site plugin provides a convenient previewAuto task that serves the resulting documentation locally,
so that you can see how it looks like, and re-generate the documentation when you edit it:
sbt:library-example> previewAuto
Embedded server listening at
  https://127.0.0.1:4000
Press any key to stop.
Browse the https://localhost:4000 URL to see the result:
Include Code Examples
This section shows two ways to make sure that code examples included in the documentation do compile and behave as they are presented.
Using a Markdown Preprocessor
One approach consists in using a Markdown preprocessor such as mdoc. These tools read your Markdown source files, search for code fences, evaluate them (throwing an error if they don’t compile), and produce a copy of your Markdown files where code fences have been updated to also include the result of evaluating the Scala expressions.
Embedding Snippets
Another approach consists in embedding fragments of Scala source files that are part of a module which
is compiled by your build. For instance, given the following test in file src/test/ch/epfl/scala/Usage.scala:
package ch.epfl.scala

import scalaprops.{Property, Scalaprops}

object Usage extends Scalaprops {

  val testDoNothing =
// #do-nothing
    Property.forAll { x: Int =>
      Example.doNothing(x) == x
    }
// #do-nothing

}
package ch.epfl.scala

import scalaprops.{Property, Scalaprops}

object Usage extends Scalaprops:

  val testDoNothing =
// #do-nothing
    Property.forAll: (x: Int) =>
      Example.doNothing(x) == x
// #do-nothing

end Usage
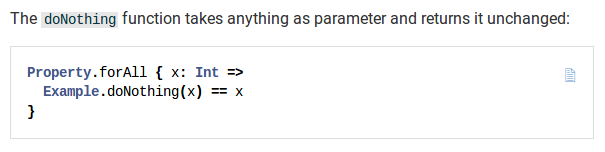
You can embed the fragment surrounded by the #do-nothing identifiers with the @@snip Paradox directive,
as shown in the src/documentation/reference.md file:
# Reference

The `doNothing` function takes anything as parameter and returns it unchanged:

@@snip [Usage.scala]($root$/src/test/scala/ch/epfl/scala/Usage.scala) { #do-nothing }
The resulting documentation looks like the following:
Include API Documentation
It can also be useful to have links to the API documentation (Scaladoc) from your documentation website.
This can be achieved by adding the following lines to your build.sbt:
enablePlugins(SiteScaladocPlugin)
SiteScaladoc / siteSubdirName := "api"
paradoxProperties += ("scaladoc.base_url" -> "api")
The SiteScaladocPlugin is provided by sbt-site and includes the API documentation to the generated
website. The second line defines that the API documentation should be published at the /api base URL,
and the third line makes this information available to Paradox.
You can then use the @scaladoc Paradox directive to include a link to the API documentation of a
particular symbol of your library:
Browse the @scaladoc[API documentation](ch.epfl.scala.Example$) for more information.The @scaladoc directive will produce a link to the /api/ch/epfl/scala/Example$.html page.
Publish Documentation
Add the sbt-ghpages plugin to your project/plugins.sbt:
addSbtPlugin("com.github.sbt" % "sbt-ghpages" % "0.8.0")
And add the following configuration to your build.sbt:
enablePlugins(GhpagesPlugin)
git.remoteRepo := sonatypeProjectHosting.value.get.scmUrl
Create a gh-pages branch in your project repository as explained in the
sbt-ghpages documentation.
Finally, publish your site by running the ghpagesPushSite sbt task:
sbt:library-example> ghpagesPushSite
[info] Cloning into '.'...
[info] [gh-pages 2e7f426] updated site
[info]  83 files changed, 8059 insertions(+)
[info]  create mode 100644 .nojekyll
[info]  create mode 100644 api/ch/epfl/index.html
…
[info] To [email protected]:scalacenter/library-example.git
[info]    2d62539..2e7f426  gh-pages -> gh-pages
[success] Total time: 9 s, completed Jan 22, 2019 10:55:15 AM
Your site should be online at https://(organization).github.io/(project). In our case, you
can browse it at https://scalacenter.github.io/library-example/.
Continuous Publication
You can extend .github/workflows/publish.yml to automatically publish documentation to GitHub pages.
To do so, add another job:
# .github/workflows/publish.yml
name: Continuous publication

jobs:
  release: # The release job is not changed, you can find it above
  publishSite:
    runs-on: ubuntu-latest
    steps:
      - uses: actions/checkout@v3
        with:
          fetch-depth: 0
      - uses: actions/setup-java@v3
        with:
          distribution: temurin
          java-version: 8
          cache: sbt
      - name: Generate site
        run: sbt makeSite
      - uses: JamesIves/[email protected]
        with:
          branch: gh-pages
          folder: target/site
As usual, cut a release by pushing a Git tag. The CI server will run the tests, publish the binaries and update the online documentation.
Welcome Contributors
This section gives you advice on how to make it easier to get people contributing to your project.
CONTRIBUTING.md
Add a CONTRIBUTING.md file to your repository, answering the following questions: how to build the project?
What are the coding practices to follow? Where are the tests and how to run them?
For reference, you can read our minimal example of
CONTRIBUTING.md file.
Issue Labels
We recommend you to label your project issues so that potential contributors can quickly see the scope of an issue (e.g., “documentation”, “core”, …), it’s level of difficulty (e.g., “good first issue”, “advanced”, …), or its priority (e.g., “blocker”, “nice to have”, …).
Code Formatting
Reviewing a pull requests where the substantial changes are diluted in code style changes can be a frustrating experience. You can avoid that problem by using a code formatter forcing all the contributors to follow a specific code style.
For instance, to use scalafmt, add the following line to your project/plugins.sbt
file:
addSbtPlugin("org.scalameta" % "sbt-scalafmt" % "2.4.2")
In the CONTRIBUTING.md file, mention that you use that code formatter and encourage users to use the “format
on save” feature of their editor.
In your .github/workflows/ci.yml file, add a step checking that the code has been properly formatted:
# .github/workflows/ci.yml
# The three periods `...` indicate the parts of file that do not change
# from the snippets above and they are omitted for brevity
jobs:
  ci:
    # ...
    steps:
      # ...
      - name: Code style
        run: sbt scalafmtCheck
Evolve
From the user point of view, upgrading to a new version of a library should be a smooth process. Possibly, it should even be a “non-event”.
Breaking changes and migration steps should be thoroughly documented, and we recommend following the semantic versioning policy.
The MiMa tool can help you to check that you don’t
break this versioning policy. Add the sbt-mima-plugin to your build with the following, in your
project/plugins.sbt file:
addSbtPlugin("com.typesafe" % "sbt-mima-plugin" % "1.1.2")
Configure it as follows, in build.sbt:
mimaPreviousArtifacts := previousStableVersion.value.map(organization.value %% name.value % _).toSet
Last, add the following step to the job ci of the Continuous integration workflow, in the .github/workflows/ci.yml file:
# .github/workflows/ci.yml
# The three periods `...` indicate the parts of file that do not change
# from the snippets above and they are omitted for brevity

# ...
jobs:
  ci:
    # ...
    steps:
      # ...
      - name: Binary compatibility
        run: sbt mimaReportBinaryIssues
This will check that pull requests don’t make changes that are binary incompatible with the previous stable version.
We suggest working with the following Git workflow: the main branch always receives pull requests
for the next major version (so, binary compatibility checks are disabled, by setting the mimaPreviousArtifacts
value to Set.empty), and each major version N has a corresponding N.x branch (e.g., 1.x, 2.x, etc.) branch
where the binary compatibility checks are enabled.